

Post Paywall
Table of Contents
- Introduction
- Installation & Requirements
- Post Paywall Settings
- WooCommerce Settings
- Post Paywall Status
1. Introduction
Update NotificationWe have updated documentation to support WooCommerce Subscriptions. Please Check on:
- WooCommerce Settings
- Creating Products
- Simple Subscription
- Creating Products
Post Paywall is a premium feature from JNews used for creating subscription or payment based content for your website. Your reader needs to buy a subscription or unlock package in order to read your post content.
Integrated with the popular plugin WooCommerce, will give you an easy way to setup products, managing orders, and payment.
2. Installation & Requirements
To enable Post Paywall on your website, you need to have the following plugins installed and active :
2.1. JNews Paywall, you can easily install and activate this plugin from JNews Dashboard → Install Plugin.
2.3. WPBakery or Elementor, you need this plugin to be able to add the Post Paywall element to your page. Choose one that is used on your website.
2.3. WooCommerce, you need to install this plugin in order to create a subscription or unlock product for Post Paywall. You can install this plugin through your WordPress Dashboard or JNews Plugin Dashboard.
3. Post Paywall Settings
3.1. Restricting Post Content Globally.
This will truncate all your post content for non-premium users.
You can access this option in Dashboard → JNews Paywall → Customizer Setting
or you can access directly from Customizer → JNews : Paywall Option → General Setting
Note : This option will override the option in point no 3.2.
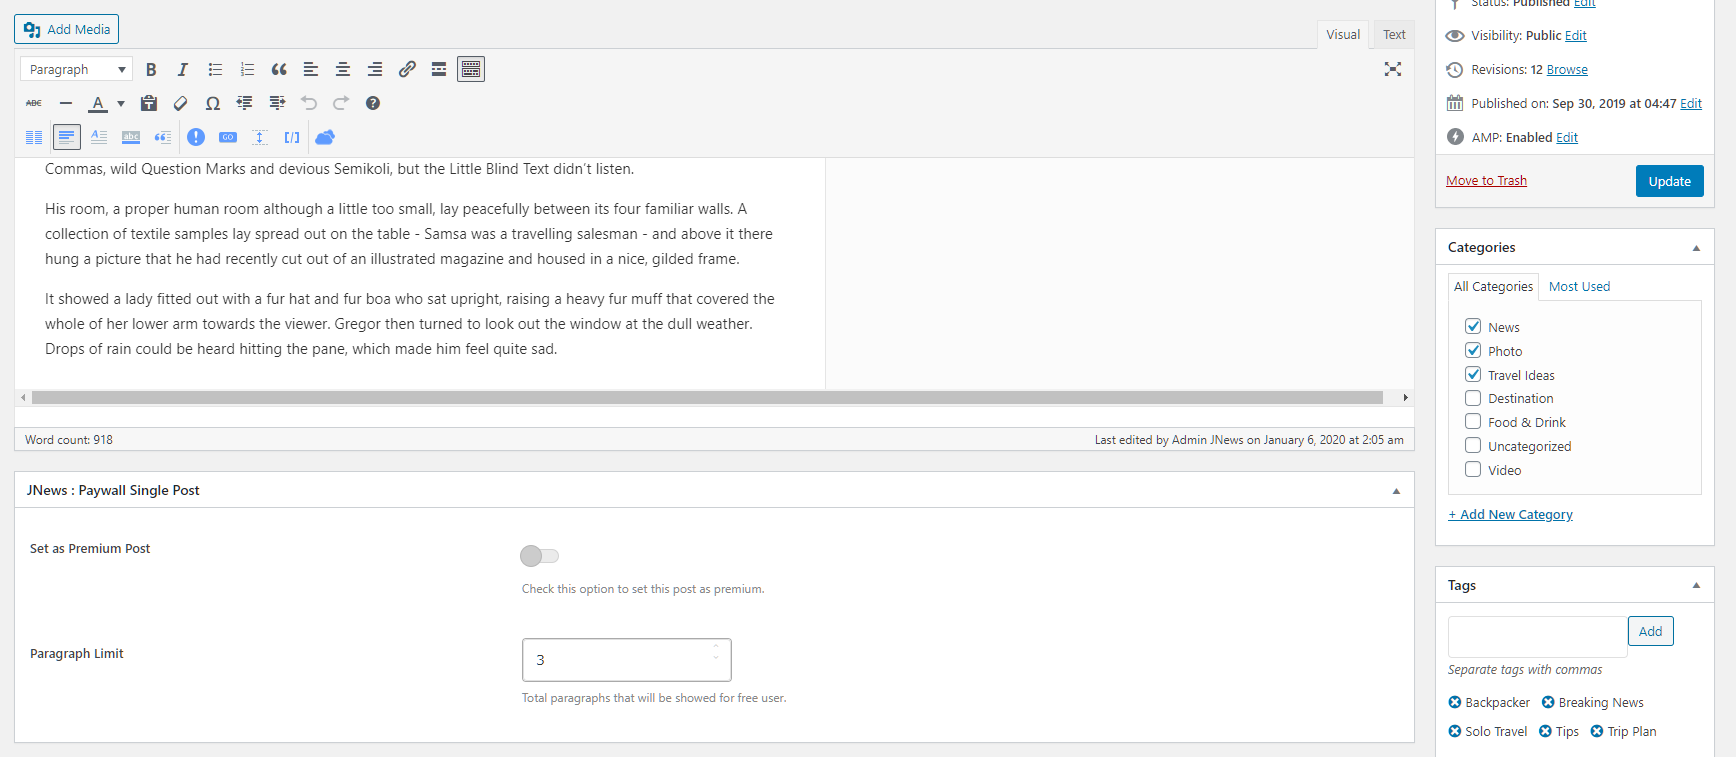
3.2. Restricting Post Content only for some Posts.
This option will only truncate the post you choose.
You can access this option when you are editing the post, you will find the JNews : Paywall Single Post meta box right under the post editor.
Note : You need to disable the option in point no 3.1 to use this option, otherwise this option will be overridden.
3.3. Allow Post Content only for some Posts.
This option will allow some posts to be unlocked.
You can access this option when you are editing the post, you will find the JNews : Paywall Single Post meta box right under the post editor.
Note : You need to make sure the Block All Posts option is enabled to use this option

3.4. Customizing locked content preview.
Paywall provides an option to customize locked content preview instead of using the truncated paragraph.
You can access this option when you are editing the post, you will find the JNews : Paywall Single Post meta box right under the post editor.

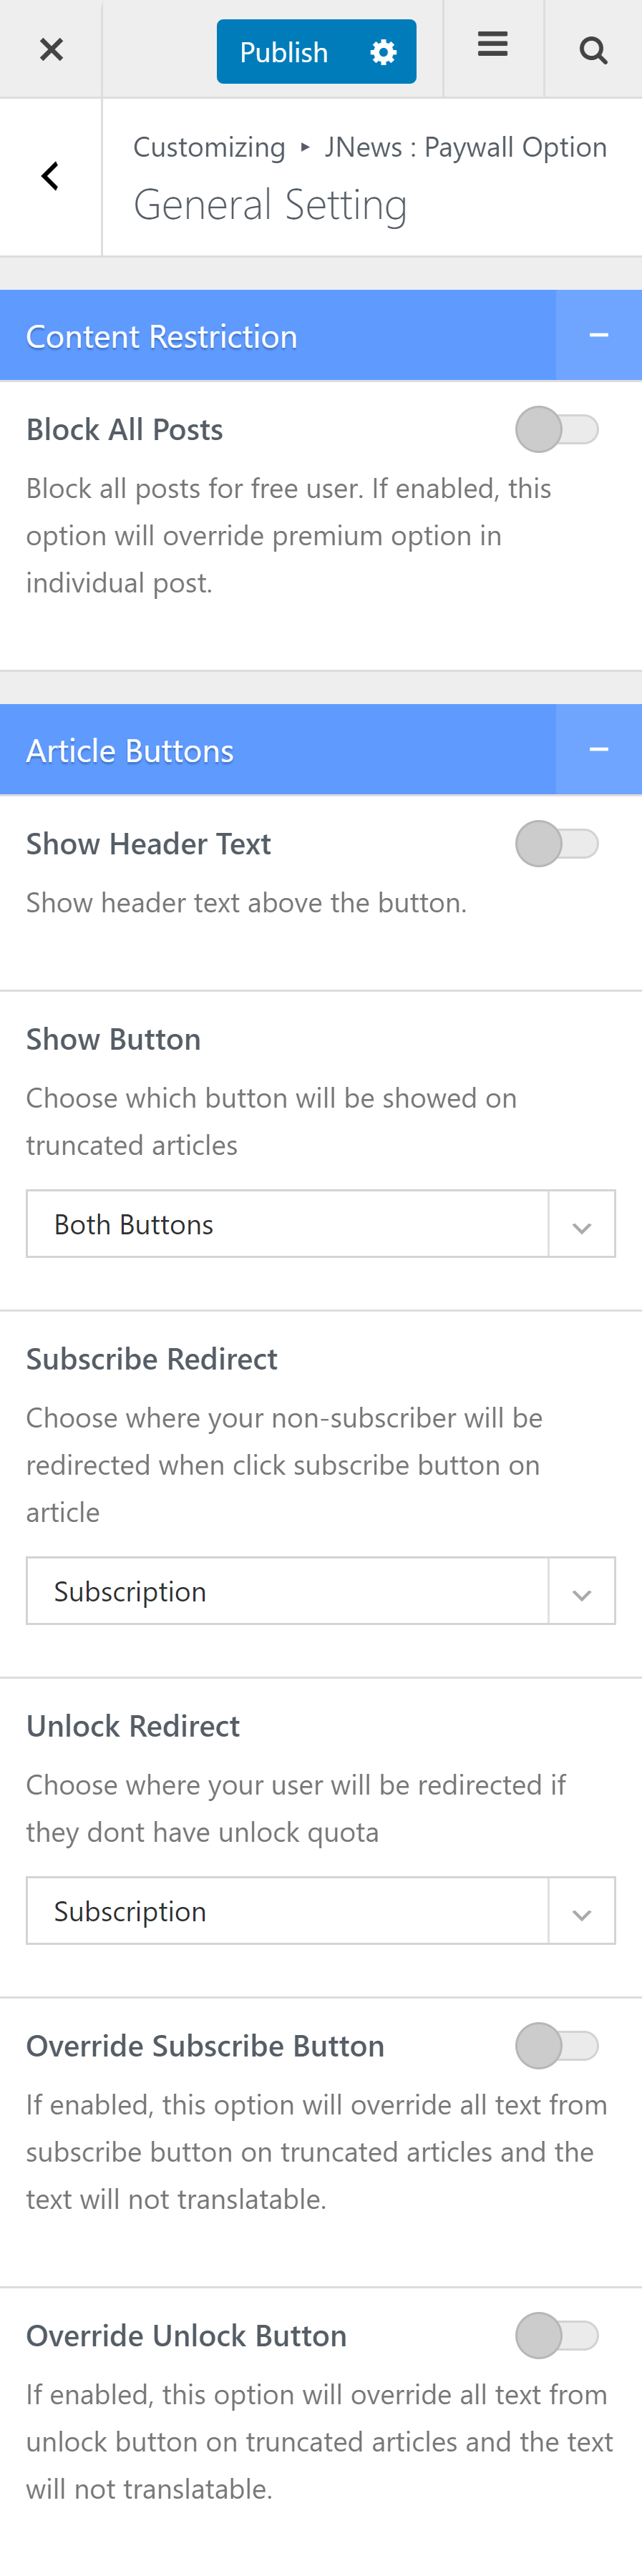
3.5. Set Article Button.
This option will set the buttons in your truncated articles. It will redirect your user to the destination page you choose.
You can access this option in Dashboard → JNews Paywall → Customizer Setting
or you can access directly from Customizer → JNews : Paywall Option → General Setting

Preview :
4. WooCommerce Settings
You need to setup your the WooComerce Setting at first, after that, you can do the following settings :
4.1. Creating Products
To create Post Paywall products is the same way as you create other WooComerce products.
You need to go to Dashboard → Product → Add New
Then in the Product Data, you can choose these product types :
4.1.1. JNews Post Subscribe product :
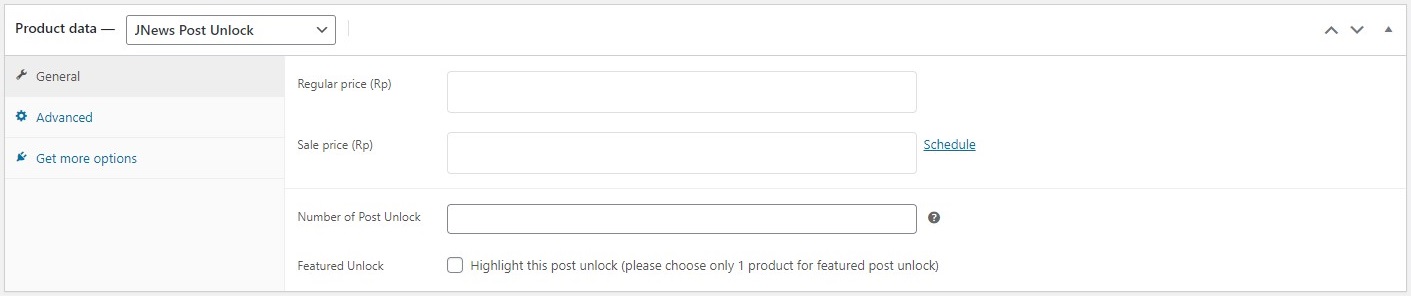
4.1.2. JNews Post Unlock product :
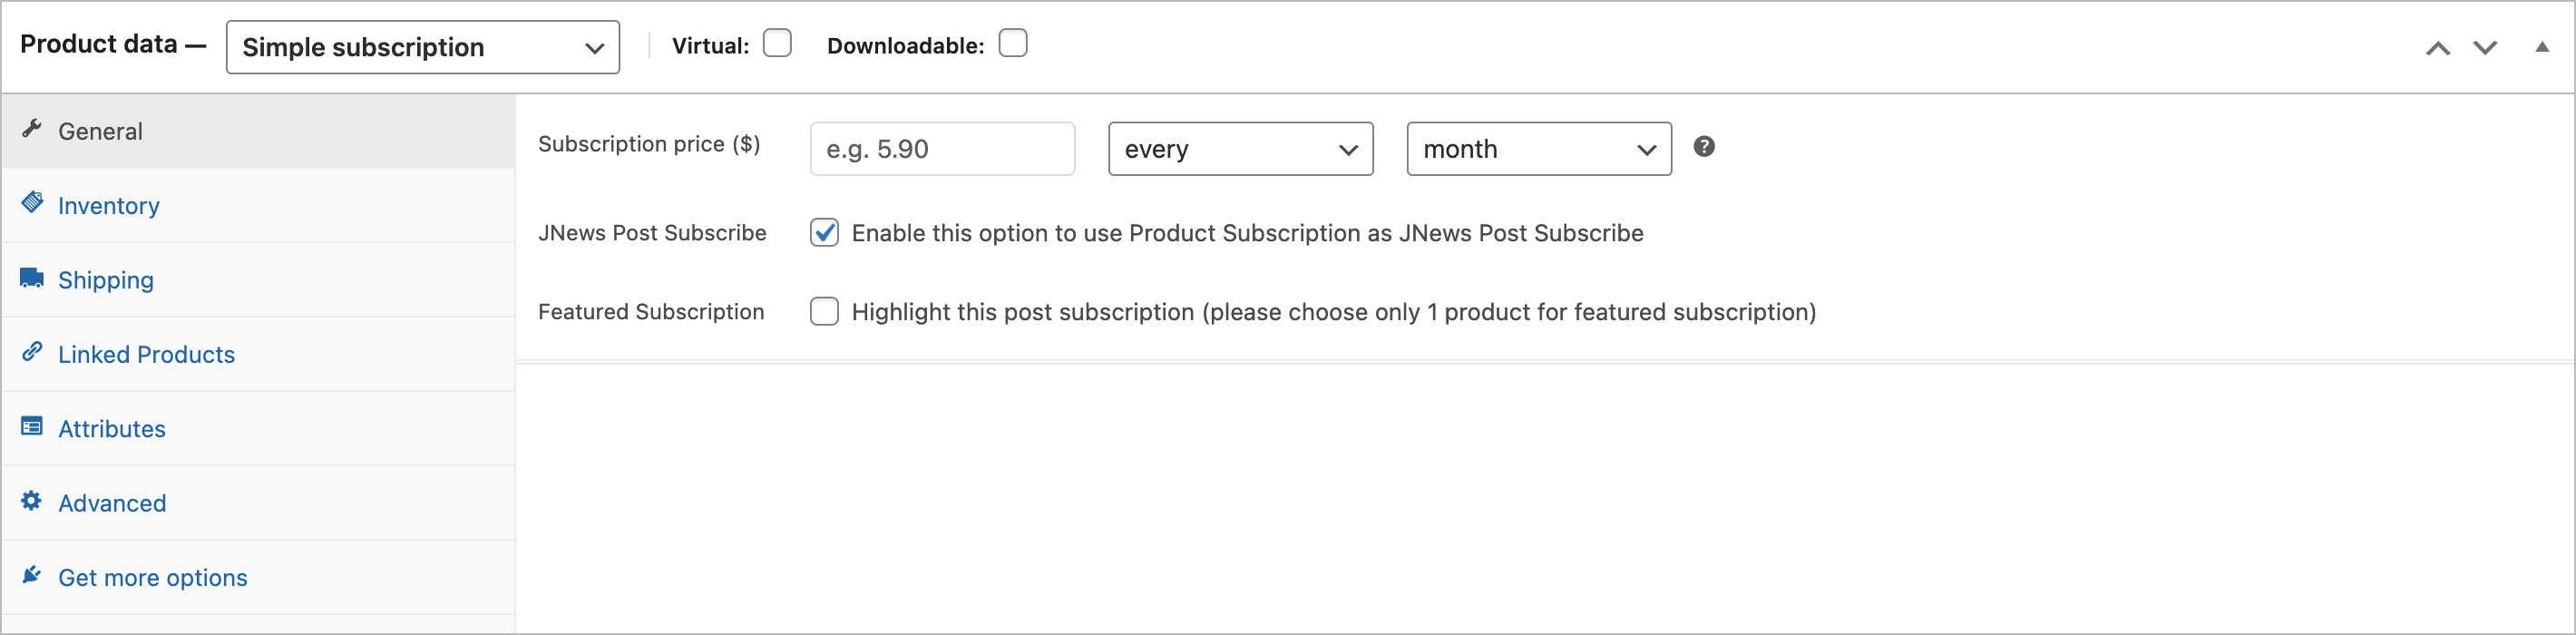
4.1.3. Simple Subscription ( WooCommerce Subscriptions ) product :
- You need to check JNews Post Subscribe option then set the product Subscription Price and Billing Time
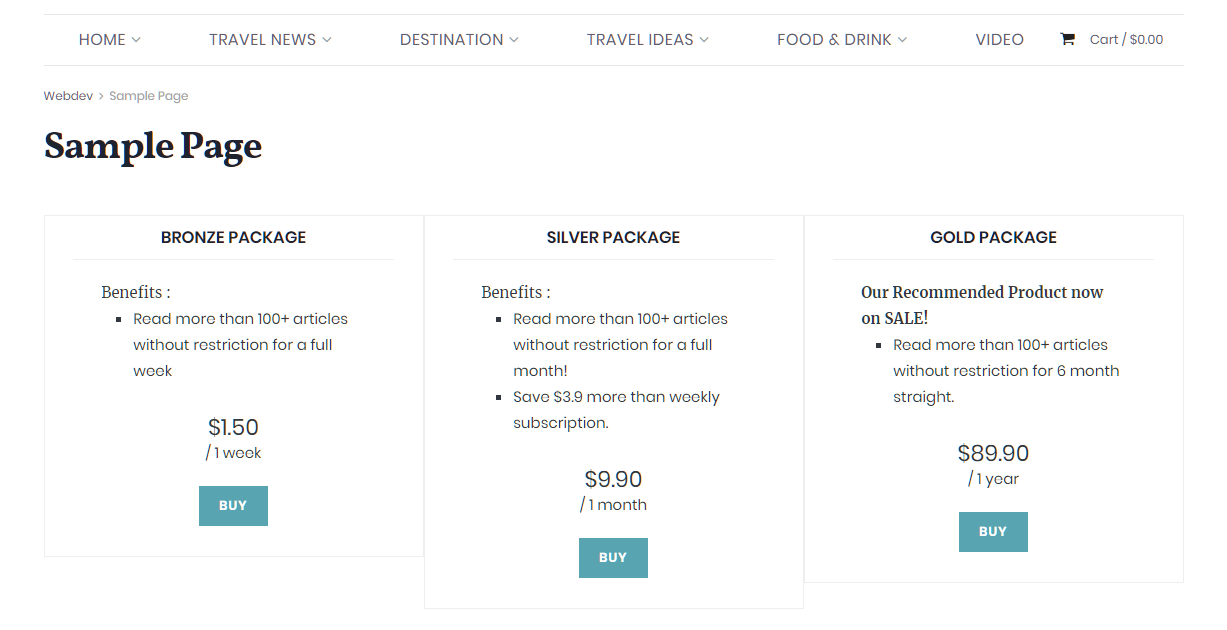
4.2. Showing the Products
After you create products, you can add it to a page so your user can access it.
To do this, go to a page you want to add Post Paywall products.
Then edit the page using page builder WPBakery or Elementor, and add the element called JNews – Post Paywall.
Select the products you want to show on the page.
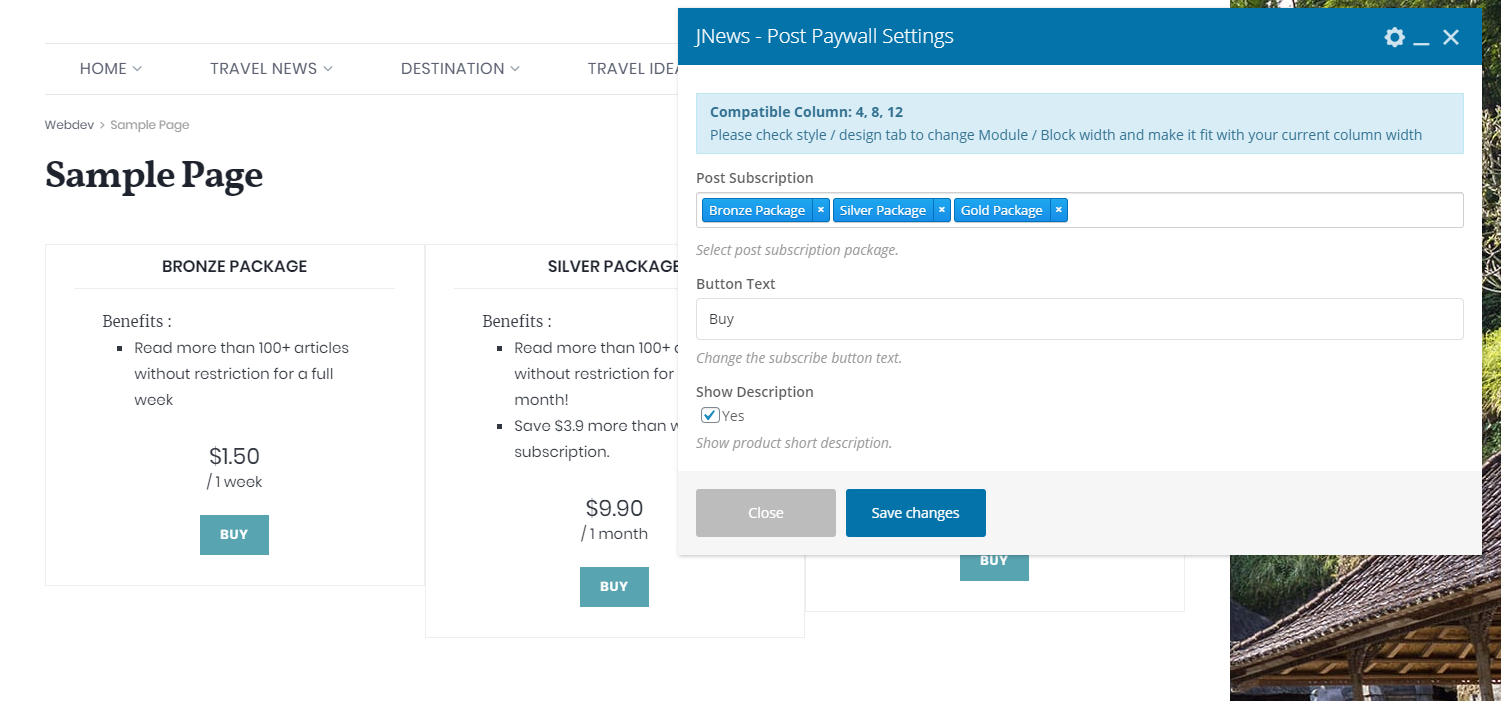
Example (in WPBakery) :
After that, you can set the page as a destination target as mentioned in point 3.3.
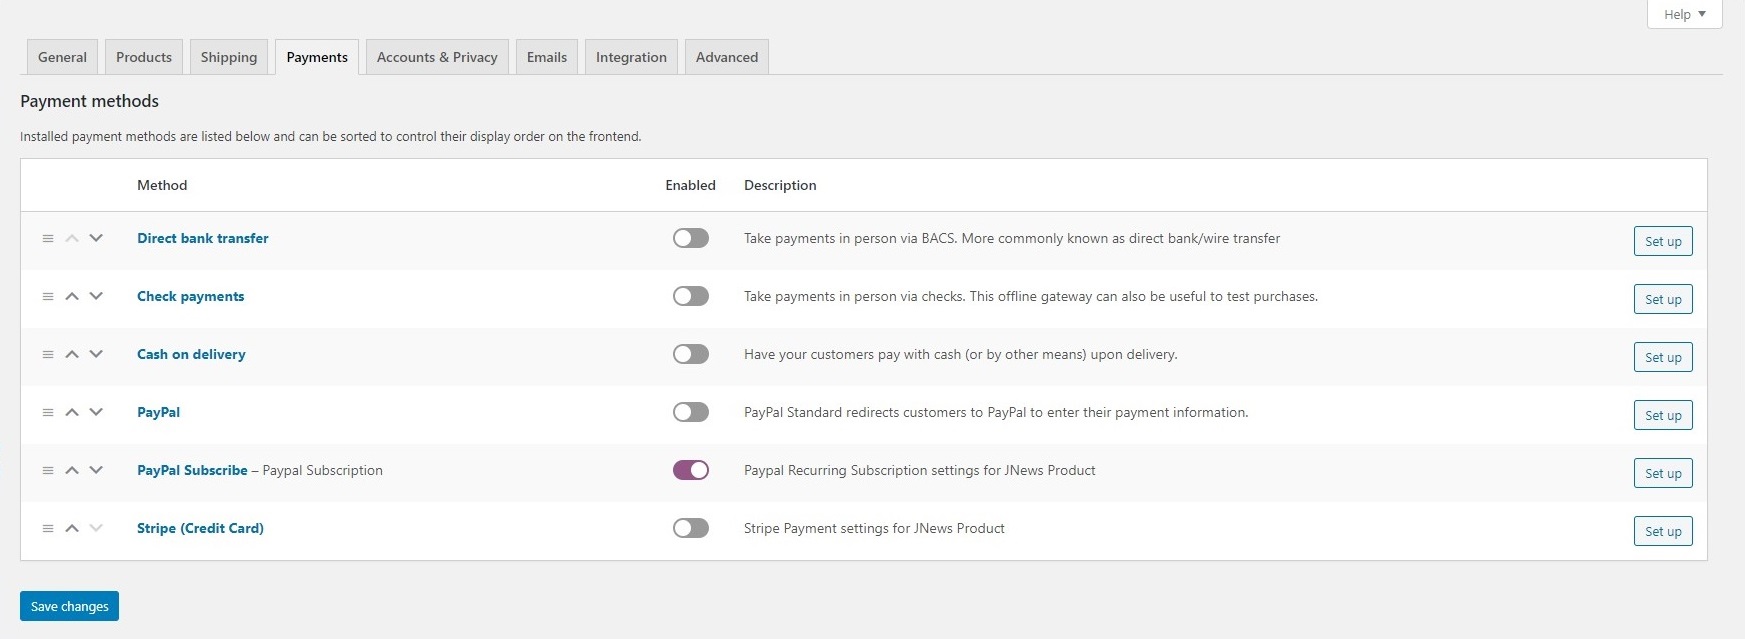
4.3. Payment Settings
This setting is required if you use the JNews product type, so your user can pay using Paypal and/or Credit Card via Stripe and create a billing agreement.
Paypal
You need to create a Paypal app & credentials.
After you create Paypal app & credentials, please go to Paypal Subscription payment settings in WooCommerce→ Settings → Payments → Paypal Subscription
Remember
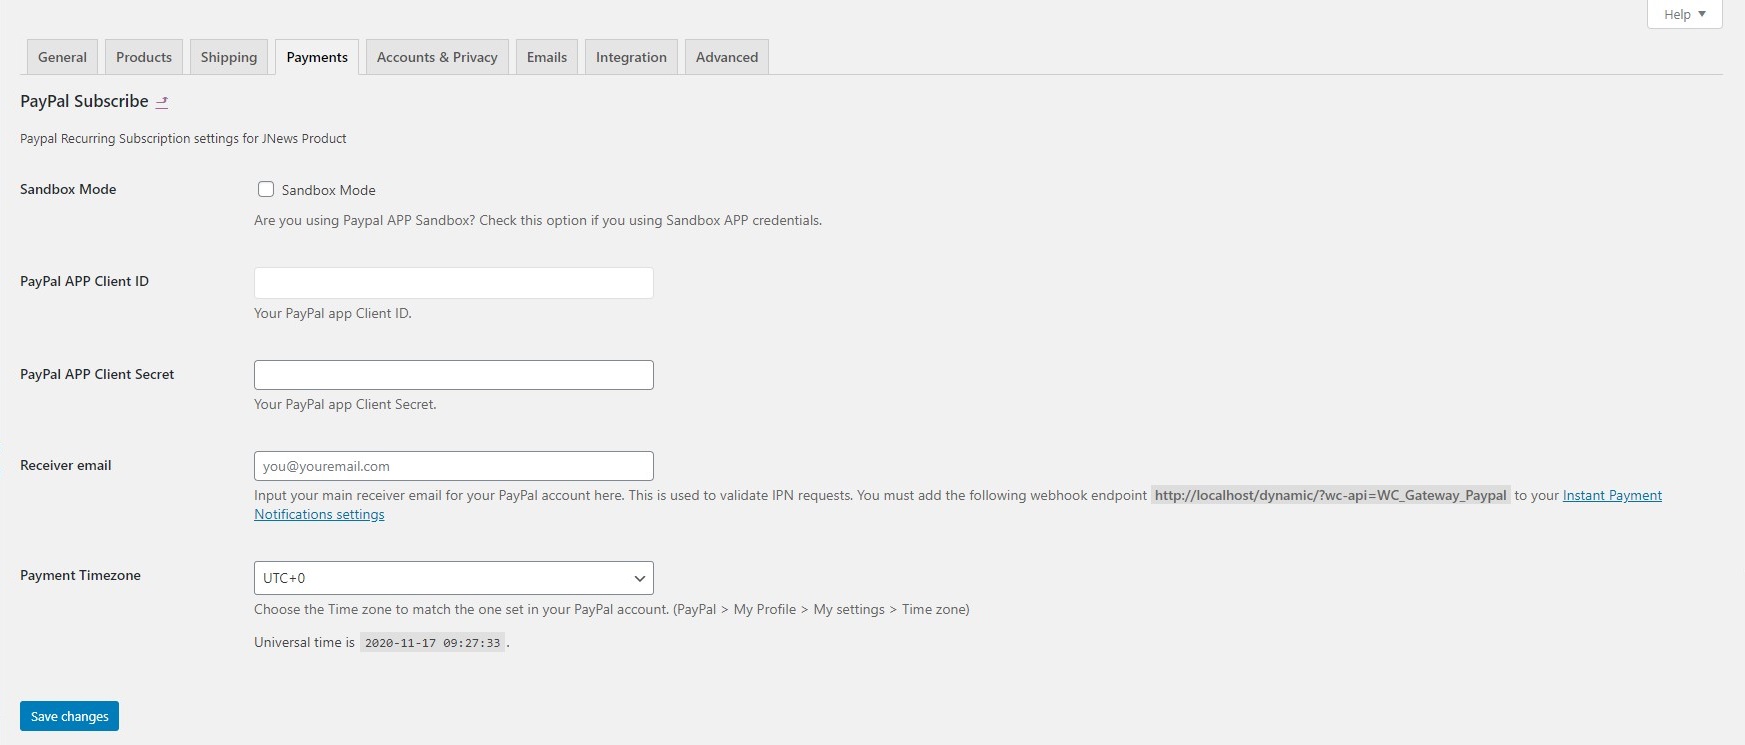
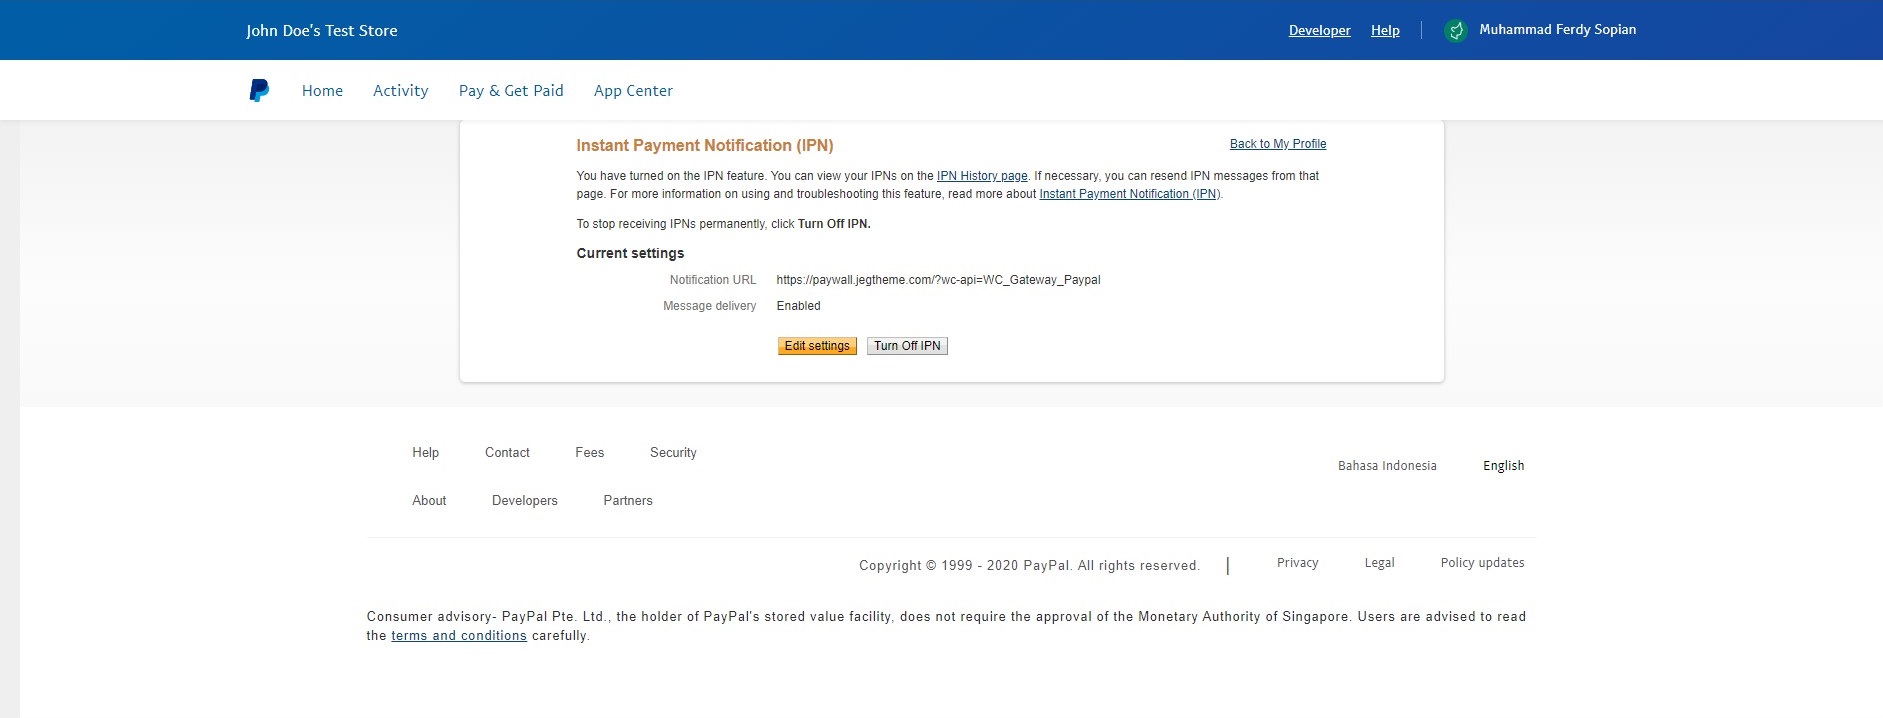
You need a PayPal Business account to use PayPal Subscriptions. Also, you need to setup PayPal IPN, you can setup Paypal IPN on Paypal Dashboard → Account Settings → Notification → Instant Payment Notificationsor you can click.
You must add the following webhook endpoint https://example.com/?wc-api=WC_Gateway_Paypal to your Notification URL. Change example.com with your domain
- Sandbox Mode
Turn on this option if you using Sandbox APP credentials. - PayPal APP Client ID
Insert your PayPal app Client ID. - PayPal APP Client Secret
Insert Your PayPal app Client Secret. - Receiver email
Insert your main receiver email for your PayPal account here. This is used to validate IPN requests. - Payment Timezone
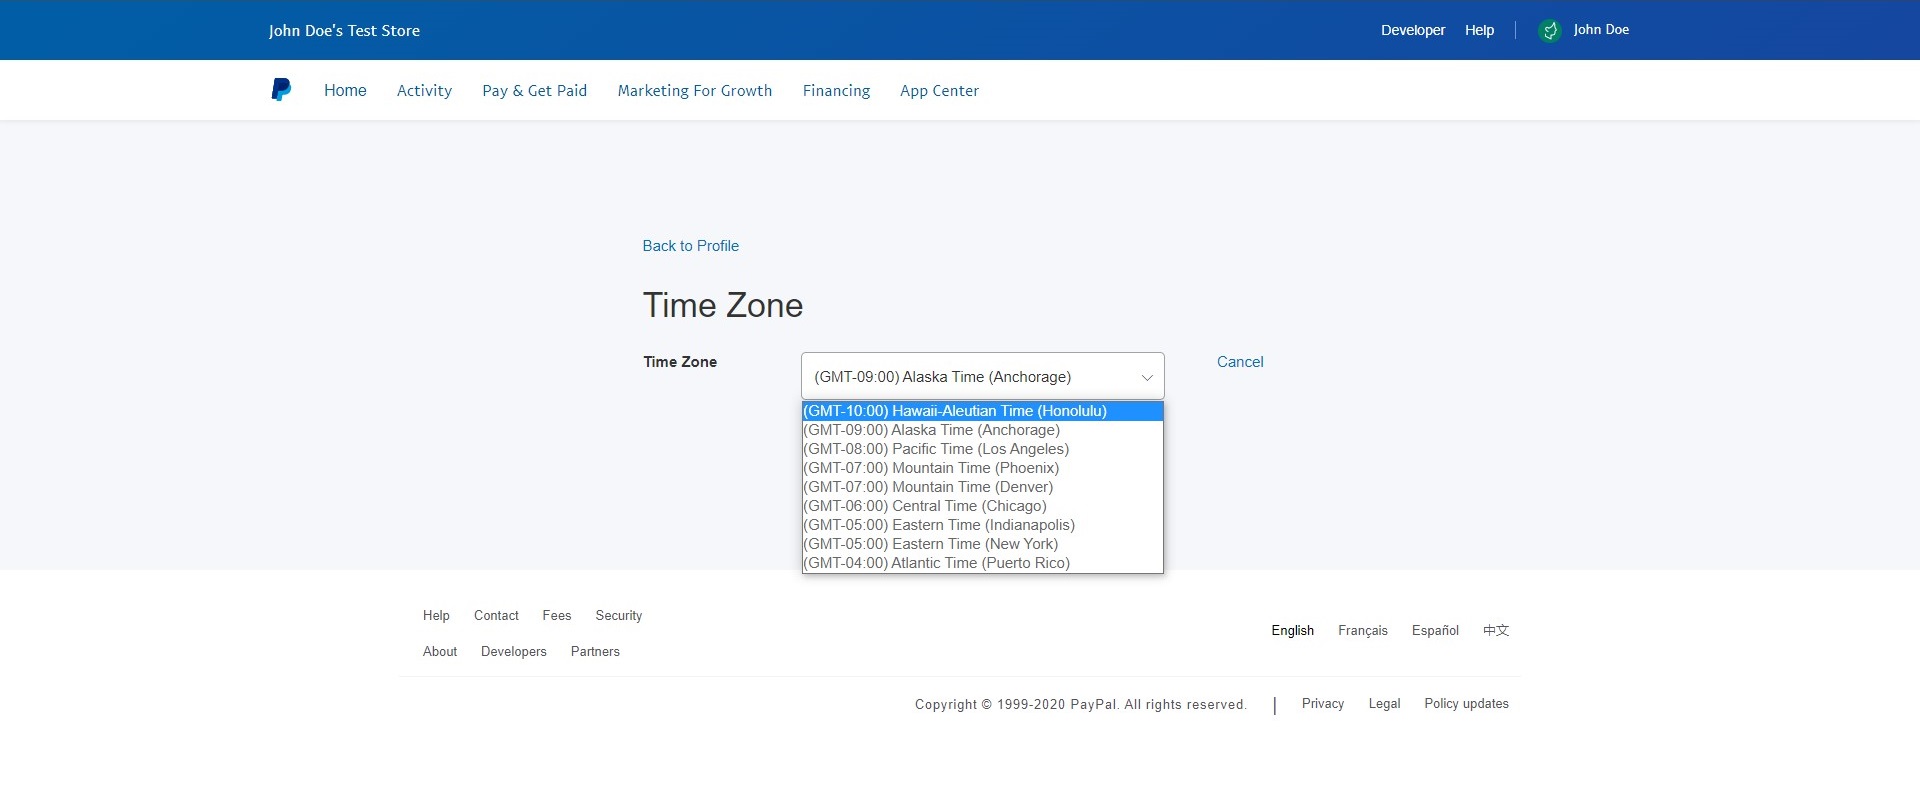
Choose your PayPal account Time zone. You can check it on ( PayPal > Account Settings > Account preferences > Time zone) or you can click
Stripe
You need to create Stripe account & credentials


